Microsoft Publisher is a desktop publishing program that can be used to create a variety of publications, particularly can be used as PDF publishers. By using Publisher, we can easily create business cards, greeting cards, calendars, newsletters, and much, much more.
How it works!
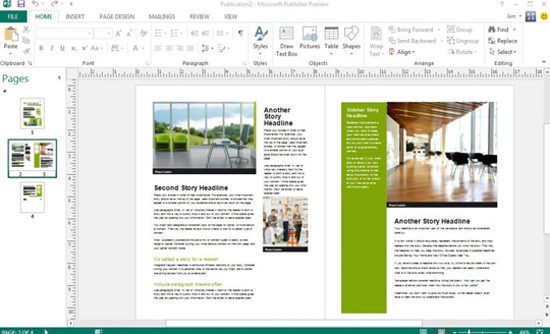
MS PDF Publisher provides you with different types of publication options to start with. Simply, click on one of the publication types in the main window or in the list on the left side of the main window to view a list of templates that will take you through the process of making basic design choices for the publication. These choices include color schemes, font styles, and more.
Frames and handles
Each publication is composed of different frames, such as text frames, picture frames, table frames, and shape/object frames. Click on different areas of the calendar to know the different frames. Handles, little circles on the corners and sides of the frame will be seen. The handles help you show which frame you have selected. They are also used in resizing the existing frames. MS PDF Publisher provides these features for the comfort of the user to create publications easily and quickly.
Screen Adjustment
To move a picture frame, click on the picture and when your cursor turns into a four-directional arrow, click and drag the picture frame to the desired location. To move a text frame, click on the text frame and rest your cursor near the border of the text frame. When the cursor turns into a four-directional arrow, click and drag the text frame to the desired location.
Resizing of frames
To resize a picture frame, in MS PDF Publisher, click on the picture and rest your cursor on a corner handle. When your cursor turns into a diagonal line with arrows on the ends, click and drag inwards at a diagonal to make it smaller or outwards and at a diagonal to make it bigger. Using corner handles to resize pictures allows keeping the picture’s proportions. To resize a text frame, click on the text frame and rest your cursor on one of the handles. When your cursor turns into a line with arrows on the ends, click and drag inwards or outwards to resize the text area.
Deleting Frames: Right click on the frame that you would like to delete, Select Delete Object from the list of choices.
Formatting Text
Click in a text frame and begin typing. Click and drag over the text you typed to select it for formatting changes. Use the Formatting Toolbar or click on Format Font to make changes to the document. Inserting Additional Text Frames: Click on the Text box from the Insert Menu, Click and drag over an area of the publication followed by Typing the text we want to appear.
Clip Art
Inserting Clip Art: If we want to change the picture in an existing picture frame: Right-click on the picture and select Delete Object, Click on Insert Picture, Clip Art. A Clip Art search interface will open in the task pane, then enter a search term and hit Go. You can choose to limit the search to a particular collection or a particular media type. Once we discover the desired clip art, click on it to insert it. The clip art has a drop-down arrow next to it. If you click on the drop-down arrow other options are visible. We can click on Find Similar Style for clip art of similar design. We can click on Preview/Properties to view the original size of the clip art and what keywords were used to classify the picture.
The Publication
To save the publication Click on the File Menu and Save As, When the Save As Dialogue Box appears Click Browse and find the location on your computer where you would need your file saved. Type the name of your publication in the File Name field. Click on the Save button. Finally, print the publication by clicking on the File Menu and Print. When the print window appears, select the desired number of copies and choose any other printing options you want and click OK.
Tags: creator, pdf, publisher